
Sometimes I like to take a break from the fine arts and focus on pointless crafty crap. Like scrap booking (or as my dad calls it “crap booking”), making bracelets, Halloween decorations, dog toys etc. Something that keeps your hands busy and you can easily do in front of the television. I’ve been sick for the past few days so spent the weekend creating an ugly basket. Well, my goal was not to create an ugly basket but that’s what I ended up with. I completely “winged” it and didn’t base it off any plans or design. This is why it turned out ugly. I don’t particularly care that it’s ugly and have been told it’s ugliness is kind of charming and cute. Without further adieu; here is the Ugly Basket:  And that’s it’s good side…
  So what’s the purpose of this ugly little basket? To hold misc. socks. I don’t actually wear matching socks so it seems rather pointless, but I do wear “semi-matching” socks. This means they need to be relatively the same size, shape and texture to “match”. Sometimes I match them with similar patterns too (stripes with stripes etc.) but never the same pair of socks. Yeah, I’m weird. My darling Husband-to-be doesn’t particularly care but I do make a point to match his socks most of the time. We all know how socks can be, often times you find one missing or it becomes a Holy Sock and needs to be thrown out. But why waste TWO socks when only one is damaged? Therefore; I throw the random socks that are partnerless onto our dresser where they await a suitable partner should one appear. This basket shall be the new home for these single socks! A sort of, “Bachelor Socks Apt.” if you will. I’m also a huge fan of recycling (Reduce, Reuse, Recycle) as I do work for a recycling company. Our dresser essentially houses all clothing we currently don’t wear but can’t throw out. Some of it is “special occasion” clothes but mostly it’s stuff I got too fat to wear but was determined “one day I’ll fit into them” so I stuffed them in a drawer. A lot of it is stuff I know I have no hope of fitting into again but I kept because they’re my favorite or I liked the colour or in some cases I barely wore at all before I got too fat (it seemed to have happened over night. Thyroid problems). I dug through them all and pulled out the ones I was willing to accept that I’ll never wear again. Except the ones I love like my Volbeat or Alex Pardee shirt. Those I’m determined I’ll either fit into one day or they’ll be repurposed to display the art on them. Anyway, here is an instructional on how you too can make your very own ugly basket!!
Step One: Cut up clothing into strips. I thought using old socks would be ironic but it turns out they’re just annoying and way too small. I ended up tying a lot of them together which just made the thing full of knots (and adding to the ugliness). So I would suggest using fabric/clothing you can cut long enough strips from. Unless you’re going for a pattern; that would require some work to determine how many/how long of each colour you’ll need. I didn’t use a pattern nor did I have any idea how I was making the thing when I started.
Step Two: Make a frame. This, turns out, is the tricky part and what makes or breaks your basket. I started with Sculpy clap and spent the time shaping, baking and painting it before realizing there’s no way it was going to hold up to the pressure of a weave.


As you can see, it didn’t work from the start. I used two colours to make the top (pictured left). This is the same method I just learned to make dog tug toys. I will likely make a tutorial for this later on but if you’re interested in learning how to make dog tug toys like this you can find the tutorial I first used HERE.
When I realized the Sculpy was a fail I used instead wire and #2 pencils. The wire was a thick (not sure the grade) kind I had saved from baling cardboard and was going to use for sculpting. I doubled it over, wrapped it around itself and taped it to make sure it was tight and there were no “pokey” pieces sticking out. If I were to do it again I’d use a stronger frame as eventually the pressure bent the wire. They weren’t quite fastened together very well either, that is also something I’d also change if I were to do it again.
 Step Three: Start weaving. If you’re not sure how to weave you should figure that out first. Here’s a Handy Instructional. I started with about 9 pieces vertical (see picture above/left). Again, what I’d change here is I would put in a few more vertical pieces to start. Maybe 11-14 instead. I attached the “rope” on the top by tying the loose ends to the wire (‘d made loops through the end of the wire so this made it easier). I used one of my sculpting tools to pull pieces of the rope loose to fit the vertical strips through and tie them. The first wall like this I did the rope was too tight and I had a hell of a time fitting the strips through.
The second one I made I made looser but I found it was too loose and ended up swaying under the pressure moreso than the first one. If I were to do it again I’d make sure they were both tight and would suffer through the process of getting the strips through. As I weaved and reached each end I put a single knot through the end wire to keep the strip in place and turn it back around. As a strip came to an end I tied a different coloured strip to it and continued weaving. Knots that had a nice “bow” look to them I kept on the outside while ugly knots were buried on the inside (if you look inside the basket it’s quite the mess). So keep note of which side will be the inside and which will be your outside.

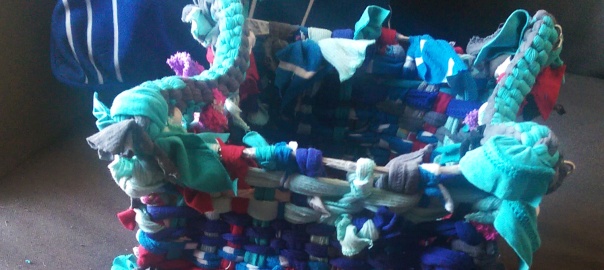
Step Four: Add the walls together. I did the small walls (with the rope “handles” on top) first and then attached the longer walls to attach the two pieces together. You can see the taped wire frame a lot better in this picture (right). I tied them to each end with the rope handles. Some I taped others I just tied. The taped ones held up better than the tied ones (I used packing tape, not scotch tape. I don’t think scotch tape would have held up). Once in place the procedure repeated: do several vertical strips first (again I would do more than I did here) and then continue with weaving.
 Step Five: Weave the bottom into place using the same method. This was easiest as I did not have to attach any walls. I did, however, have to keep readjusting the basket to keep it from weaving into a Leaning Tower of Pisa look. This time, instead of picking out pretty “bow” knots to leave on the outside I made sure all knots were tucked into the inside. This was to keep the basket from being unbalanced. However, kind of a pointless procedure as my basket collapsed under itself anyway. If your basket is sturdier this makes more sense to do.
There you have it! Your very own ugly basket!
I hope yours turned out much prettier than mine.
